Home-made baby sitting harness (for sitting at table)
In an earlier post, I wrote about some ideas for making home made harnesses. I also mentioned that none of them were 100% right for my needs, and that I had made my own based mainly on the Canadian Living example, but with some modifications. This is what I came up with.
In an earlier post, I wrote about some ideas for making home made harnesses. I also mentioned that none of them were 100% right for my needs, and that I had made my own based mainly on the Canadian Living example, but with some modifications. This is what I came up with.

GET MY PDF PATTERN HERE
- but the tutorial is in this post, below. You can skip the bits in red if you just want to get on with it, but they contain further explanations of why I did what I did.


Here's an example. Once, my second daughter, as a toddler, fell backwards through a chair in a restaurant in Turkey. (We didn't have any harness then!) There was a large gap between the seat and the chair back, and she almost landed on the marble floor. Luckily she wasn’t hurt, just surprised, but the memory of that has stayed with me. Just one example of the kind of flexibility I wanted to build in: I needed to be able to fill a gap in the back. (If you imagine the white chair at the front of my picture with the top rail much higher, you'll be close to the type of chair in that restaurant.) In fact just about the only situation we have come across where my seat harness doesn't work is in pubs and restaurants which just have benches. Which means resorting to feeding baby in her pushchair, or on your knee.
I'll give a more detailed explanation below of how to make my version. And you can find my pattern here. If you also want to use the Canadian Living pattern as a basis, here's a summary of the main adaptations I made:
- Firstly, I made the seat part much longer, with the ability to lengthen and shorten it as required (for different chairs / different babies). I considered doing this middle section as elasticated down the sides (a bit like knicker-legs) but decided it would be too bulky, so mine has a fold under part which can be adjusted in length.

- I also made a hole at each corner so a corner post could stick through. The side post of a dining type chair is called the ‘stile’, and the top of it is called an ‘ear’. The ear can just be the top of the stile unadorned, or it can be a fancy scroll, or a ball – even a spike. Our own kitchen chairs have a round ball on the top of each stile. So I made holes for these 'ears'.

·
- I made a separate band of material to wrap tightly right round the chair back to avoid the ‘baby through the hole’ problem, on our dining room chairs. I don’t know what the technical term is for this gap. You could attach this band permanently to the rest of the harness so it doesn’t get lost, (see the This Mama Makes Stuff version on my other post.). But I thought it was more flexible as a separate piece. We also used it sometimes as extra reinforcement round the baby.

·
- · The top part of my harness that goes over the chair back is pretty wide, and has a drawstring to tighten it around a narrower chair. I haven't really got a picture of this (you'd need to see it from the rear), but you can perhaps just see how it gathers up, and the ends of the drawstrings poking out, on this picture.
- And finally, I made a sturdier method of attaching to a chair, as Baby I was at that stage only a few months old, not fully able to sit up on her own. I made stronger straps out of webbing, and attached a couple of strap loops, one near each end of the back, for the straps to go through. So the straps go round either side of the baby's body, then up and through the strap loops, to fasten with a side release buckle at the back. So the baby can't easily pull the straps down at the sides and escape or fall out.
In spite of all my modifying, and in the end designing my own harness, my thanks are still due to the inspiration from all of the web sites I looked at.
For full details of how to make my version, read on!
For full details of how to make my version, read on!
Materials needed:
- My free PDF pattern
- 1 ½ yards (1.4 m) of strong close weave fabric (canvas, denim etc – I’ve used denim) preferably 54” wide - let’s call this the base material. If you can get double-sided denim, that's even better. My material was narrower than that and it was a bit tight. I had little to spare at the end. Double-faced pre-quilted fabric would work, too.
- (OR: double the quantity of two thinner fabrics – you still need them to be close weave.)
- 4.5 yards (4m) double fold bias binding tape
- Sewing thread
- Velcro
- Contrasting material for the front. I also used this for one side of the wide belt to go round the chair. You do not need this if you have two-sided fabric, unless you want it for the decorative effect.
- Cord or elasticated cord for drawstring
- Drawstring toggle
- Side release buckle (I found some in colours like red, green , yellow, white, black etc) and possibly 1 ladder buckle
- Webbing for straps (depending on thickness of your base material)
- Buttons, elastic, button-hole elastic (these are for alternative methods of creating the adjustments)
Pattern and Pattern Layout
I have done an additional post with a PDF pattern you can print for the main body of the pattern. It comprises 9 pages plus a layout sheet.
Do look at the shape in the photo, it will show you what you are aiming for. My PDF only covers the main pattern piece, not the straps.
I have done an additional post with a PDF pattern you can print for the main body of the pattern. It comprises 9 pages plus a layout sheet.
Do look at the shape in the photo, it will show you what you are aiming for. My PDF only covers the main pattern piece, not the straps.

Once you have this main pattern piece, you just need some rectangles cut from your main fabric.
- Belt loops - cut two 9 cm wide (3.5") by 13.5 cm long ( 5.25")
- Reinforcement strips - cut two 5.75 cm (2 1/4") wide by 30.5 cm long (12")
- Straps - cut two 60 cm (23.5") long by 7.5 cm (3") wide (OR use webbing of about 1" width); longer if you want to dispense with a buckle.
- One piece of your main fabric 136 cm (53.5") long by 28 cm (11") wide. If you haven't enough width left in your material, I suggest at least a minimum of 23 cm (9"),
- Two pieces, one each from your main fabric and your contrasting fabric, 136 cm (53.5") long by 15 cm (6") wide - again, if you are short of material you could use less width but I wouldn't use less than 12.75 cm (5") wide.
I placed my main pattern on the fold of the denim, as shown above, and cut all my denim pieces out. Then I put the main pattern piece and the band piece on my contrasting fabric (no picture here) and I cut out the band, and a piece to form the front of the harness. To cut out that front piece, I folded the fabric, and followed the curves of the pattern from the centre front of the top, round the side pieces where the straps will attach, and down to somewhere around the middle of the long side curve. Then I cut straight across to the fold. This will perhaps be easier to understand from the picture below. It wasn't a very exact science. My front measured about 28 cm (11"), taking the measurement along the fold line from the centre front. Your goal is only to make sure you have a piece deep enough the cover the front down to whereabouts the baby sits on it. And make sure there is an extra half inch or centimetre at the bottom edge to turn under the raw edge. I've marked a line on pattern piece 4 to give you a guide.

So here are all the pieces cut out. On the left, the two pieces for the band. Next, the two straps, that I eventually abandoned in favour of webbing. Below the straps in the picture, the front piece of contrasting fabric, surrounded by the two strap loops, and the reinforcement strips. Finally, on the right, the main part of the harness, unfolded.
Putting the harness together
Nearly all of this is very easy. There are some alternatives that require a bit more thought, so you could say these are the trickiest bits. I like to start with these first, then once you’ve done those, everything else is really easy!
Step 1: First make the straps (or find your webbing!)
Eventually, I decided to use webbing for the straps as, once I'd made the straps out of denim, I decided it was too thick to be doubled and quadrupled up to make the seams. If you are using a thinner material than I did, you could use the same material for the straps. So I'll give you the method for making the straps anyway. However, if you've decided to use webbing, you don’t need to do anything else at this stage, except to thread the buckle parts onto two pieces of webbing.
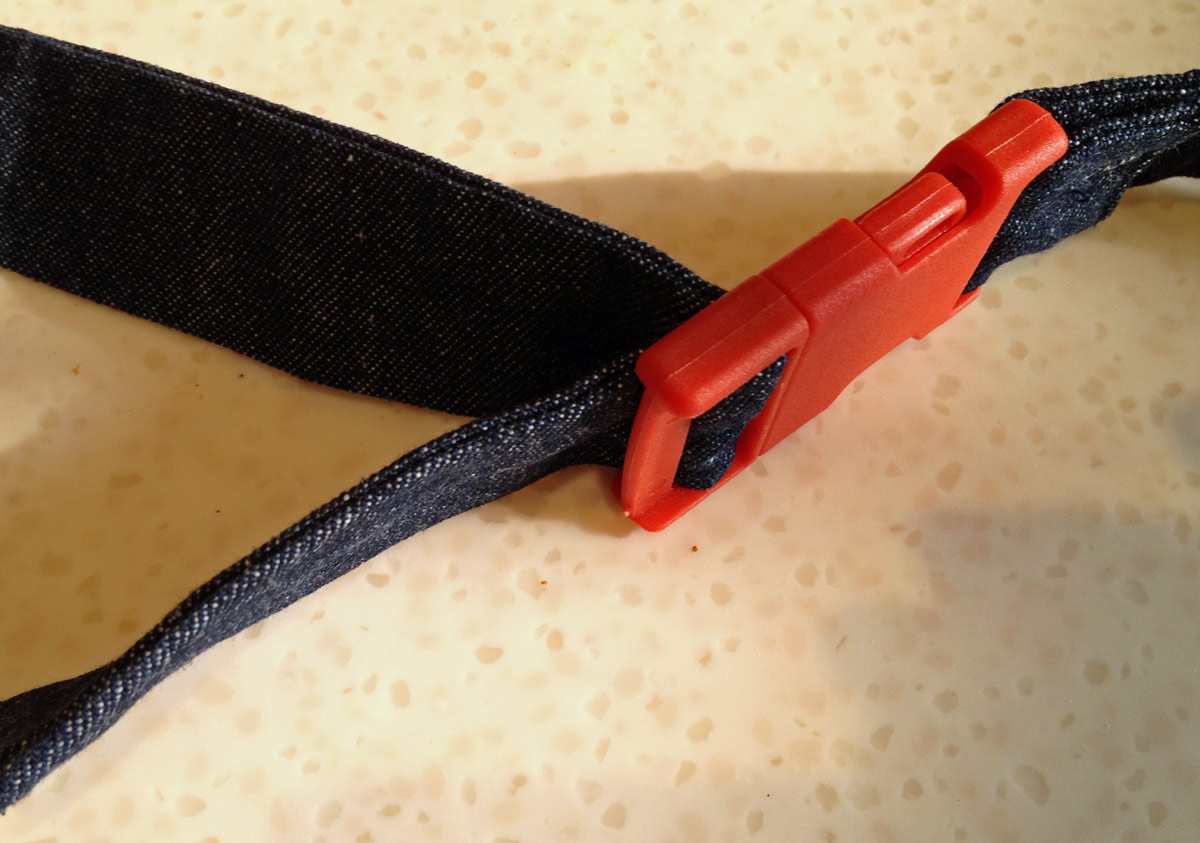
In most of my pictures, I show the straps I made myself, but I abandoned these in favour of purchased webbing, in a nice red colour, because of the difficulty in threading the lumpy seams through the buckles. You can just get a glimpse of the red webbing in the picture at the top of the blog, with Baby I sitting in the harness, and a better look at it below.
So skip this bit if you are going to use webbing, and go straight to step 2, having threaded your webbing through the buckle pieces.
(You could do the straps without a buckle, as in the Canadian Living design - in which case, I would make them a bit longer. But you'd need to be sure to tie them very firmly so they wouldn't slip. Personally, I prefer the buckle.)
Pin each strap right sides together down the length, and sew all along the seam, about half an inch from the edge. If you are going to hem the ends (as opposed to just serging them), I like to iron under the end hems before I do this, it's so much easier to get a neat end if you do this first, then just open it up a bit up as you sew.

Your goal is to ensure the finished strap will be no wider than can pass through the buckle – should be c 25 mm or 1” wide. Do not sew the ends yet. Trim the seam. Put a safety pin in one end of each strap through just one layer of material, and push it all the way through to turn the strap the right way out. Remove the pin. Press the strap flat. I suggest then threading each strap through the buckle part while you still can, before finishing the ends.

Finish the ends by serging, or by turning a small hem into the centre of the strap and over-sewing it.
I wanted to be able to adjust the length of both straps easily, so I added a ladder buckle on the non-adjustable side of the main buckle so I could adjust this strap as well. No way was the thick end of my original strap going to go through the ladder buckle, even though I'd squeezed it through the side release buckle. So that's the point at which I bought red webbing and started the straps again.

By the way, the Canadian Living harness just uses a continuation of the bias binding tape for ties, rather than strong straps. This might be OK for occasional use, but I think stronger straps are better.
I wanted to be able to adjust the length of both straps easily, so I added a ladder buckle on the non-adjustable side of the main buckle so I could adjust this strap as well. No way was the thick end of my original strap going to go through the ladder buckle, even though I'd squeezed it through the side release buckle. So that's the point at which I bought red webbing and started the straps again.

Set the finished straps aside for now.
Step 2: Get the main body of the harness ready
If you have managed to get double sided denim, or some similarly double sided fabric, such as the double-sided quilting used in the Canadian Living harness, your main body is ready as soon as you have cut it out.
If you are using thinner fabric in two layers, now is the time to join them together. If you plan to have bias tape all around the main body, as I suggest, you don't need to sew them back to back and turn inside out. However, I think it is a good idea to tack the two layers together (wrong sides facing), so you can treat them as one piece of fabric from now on.
If you are using a thick material which is NOT double-sided, like mine, you may want to add a contrasting fabric just to the seat front. Otherwise, you will have the wrong side of the fabric showing at the front of the harness. Make a small hem at the bottom of the contrasting fabric, and tack to the main body of the harness, wrong sides together. Sew across through both fabrics. Press, then pin the two together round the top and sides. I think it's a good idea to tack them together round the top and side edges.
In this picture, there is a flap turned down so you can see the wrong side of the denim beneath. The rest of the wrong side of the denim won't really be seen, as it will be below the baby's bottom, and going up facing the back of the chair behind the baby. (This picture already has the reinforcing straps attached, which is the next stage - read on!)

Next, make the adjustable seat section
Note that this is on my pattern; it is not on the Canadian Living pattern, so if you have used that, without any adjustment, you won't have an adjustable seat section so you can skip this part.
Decide whether you are going to have the adjustable seat section adjust by means of Velcro, press studs, or buttons and button holes. If you are confident about making button holes and have a machine that can do them, then I’d recommend using the button and button hole method. I’m not, and I usually don’t. I usually use Velcro or snaps. However, on this occasion, I did have a go, and the button holes are OK. Not great, but OK. And still functioning a year later.
This diagram below shows approximate finished measurements for the reinforcement straps. NOTE: if you are using a fraying type of material, as I did, I've included a hem allowance of about 1/4" all round (bit more than half a centimetre). However, you could use some 4 cm - 4.5 cm (1.5" - 1.75") wide tape for the reinforcement, which wouldn't need hemming at the sides (but might at the ends).
 These measurements will be fairly accurate for buttons or press-studs; if you are going to use Velcro, as per my original intention, you need to do a bit of trial and error before you commit. Note that the two pieces of Velcor need to be the opposite type i.e. hooks v fluffy.

Take your reinforcement pieces, and iron a narrow (1/4”) hem all around. (This picture also show the strap loops in progress, after stitching them in two.)

If you want to be neat about this, I would tack the hems. Then attach the reinforcement pieces near the sides of the seat section as shown, with the wrong side of the reinforcement piece facing the wrong side of your main harness piece. In other words, the reinforcement pieces will end up underneath the seat.
For positioning these, I suggest a degree of trial and error might help - you'll see below I got it wrong to start with. But where I finished up was like this:
In other words, if you measure down 9" from the centre of the front, and then take a line across at right-angles, going 2 1/4" either side of the perpendicular, you'll get the approximate positions for the corner of the reinforcement straps.

If you want to be neat about this, I would tack the hems. Then attach the reinforcement pieces near the sides of the seat section as shown, with the wrong side of the reinforcement piece facing the wrong side of your main harness piece. In other words, the reinforcement pieces will end up underneath the seat.
For positioning these, I suggest a degree of trial and error might help - you'll see below I got it wrong to start with. But where I finished up was like this:

In other words, if you measure down 9" from the centre of the front, and then take a line across at right-angles, going 2 1/4" either side of the perpendicular, you'll get the approximate positions for the corner of the reinforcement straps.

(The sharp-eyed may have spotted that in the earlier picture, the reinforcement straps overlap the faced part. I found that just butting the strap up to the edge of the faced part as shown in this picture put them too far back. So in other words the earlier picture, and the measurements above, are correct. My straps acutally did overlap the facing.)
If you are going to use buttons, measure from the back end of each reinforcement piece – i.e. the one nearest the long end of the harness) where to place the buttons, then sew two large buttons on as shown. Then measure along for button hole placement (at least two button holes horizontally across the reinforcement strip) and make the button holes. I’m not going to give you a detailed explanation for making button holes, because either you can do it, or, like me, you can’t, and probably never will be able to. (Having said that, I did put button holes on this - a very rare thing for me to do!)
One alternative for non-button-hole-sewers is to put a number of press studs (snap fasteners) along the reinforcement strips, or snap fastener tape, with the male bits one end and the female bits the other, so that you can attach different male bits to female bits to lengthen or shorten the seat.
The lazy way and hence my preferred way (if you don't want to do buttons, that is) would be to sew long Velcro strips onto the reinforcement strips, with the fuzzy side one end of each strip, and the hooks the other, so you then use the Velcro to make the adjustment.
Back hem and drawstring cord
The only other remotely fiddly bit is the back hem and drawstring cord. You want the drawstring toggle to come through the centre of the back, so you can tighten it evenly each side. So you need a gap in the back hem. You could just leave a bit of the hem seam unstitched, so the drawstring will come out through the top of the hem, i.e. an inch above the bottom. Or you can make a slit and serge the edges, so the cord comes out through lower down the hem. That works better, if you can be bothered.

Fold and press the hem. This means turn down half an inch, press, then turn down a further 1 ¼”. Put a pin in the midpoint.
If you are just leaving a gap in the seam rather than cutting a slit, make the hem by sewing from each side to about half an inch from the middle, so you have a 1” gap. Make sure you reinforce the ends by sewing back and forth at the end of your stitching lines.
If you want to make a slit in the hem, - which I think sits neater - snip a slit from just above the first hem fold to just below the second hem fold. Serge all the edges of the slit (or use a tight zig zag stitch or button hole stitch on your sewing machine) to reinforce the slit. Then sew the hem all the way across, above the slit.
Thread your cord (elastic cord is best) onto the toggle so the toggle is in the middle. Attach a safety pin to each end of the cord, and thread the cord through the hem each side until it reaches the ends. Sew the ends of the cord firmly to the ends of the hem. Then pull a bit of the cord out through the toggle.


Can't find a toggle? You could just put elastic through and tie in a knot in the middle - but trhe toggle looks neater.
Now you are ready to do the easier and more enjoyable parts of putting the harness together. Here are the steps.
Make the strap loops
I like to press a narrow hem on each end ( ¼”) first, so that when I come to sew the ends in, the folds are already there. Fold right sides together along the length, and sew along about ½” from the edge. Trim the seam, and also carefully trim the corners. (If you are using a thick fabric like my denim, the corners will be very thick when you sew the ends.) Turn these right side out (they are short so you probably won’t need a safety pin to do it) and then press flat but with the end hems pressed in. Oversew each end.
Position the strap loops on the back fold-over part of the harness as shown, about 1" (2.5cm) from the fold, and about 2" (5cm) from the drawstring hem. If these conflict, stick with the 1" from the fold. The top outside corner wants to be about 1" from the corner of the 'ear hole'. Attach the top and bottom of each loop only, to the harness, on the right side of the material, using a box and an 'X' as shown. If you are using two layers of material throughout, go through both layers of the fold-over part. Don't make the loops too taut, remember the straps have to go through.

Decoration
If you plan to have any motifs on the front of the seat back, attach these now, centring them a couple of inches down from the fold line. I had pink material with red cherries as my contrasting seat front, so I thought these large and small strawberries would make an attractive fruity decoration on the back. They do look nice, but are largely hidden by the baby in situ! See pics of baby using the harness. I might have done better to put them nearer the fold and the outside edge, if I'd wanted them seen in use.

Making the chair ear cut-outs
Cut two small pieces of bias tape long enough to go fully round the ‘ear cut-outs’. Don’t cut them too short. Sew these on. Here's my preferred method. Pin the tape with one side opened out, with its edge to the edge of the curve on the right side of the material, and sew along the fold line (of the fold which has been opened out). Press. You can clip the curves of the tapes if you want them to lie flat - I didn't do this.


Then turn the tape over in half so that an equal amount is showing on both sides of the material, and pin and sew on the wrong side. Press.
(I think now I might reverse this and sew the seam on the inside first, and then the outside, you can keep it a bit neater.)
Making the fold-over part to go over the chair back, and binding the harness
There are two ways you can do this. You can fold the fold-over part of the harness on the fold wrong sides together, and attach the rest of your bias tape from the bottom of one ear cutout, starting with the double layer of the foldover and back, down via the side, and up over the double layer of the front (that is, if you have put an additional panel of contrasting fabric at the front). You'll go all the way round the front, then back up the single layer of the second side, and up the double layer of the fold over and back again till you reach the bottom of the second ear cutout.
This diagram works whichever of the two ways you decide to add the bias tape.

The alternative is to fold the fold over part RIGHT SIDES TOGETHER (yes that’s correct) and pin the sides together. Take the rest of your bias tape, and start attaching it from underneath one of the ear cutouts (making the edge neat), right down one side past the reinforcement strips, round the front (over both layers if you’ve added a contrasting panel), and back up the other side to the bottom of the other ear cut out. Press it all. Then turn the fold over back the other way so it is right side out. The bias tape will be on the INSIDE of the fold-over section, but it will neaten the inside. (You could use less tape and not bother about taping the side of the fold-over section, and just serge the seams if you wanted.)
This diagram works whichever of the two ways you decide to add the bias tape.


You're nearly there!
Attaching the straps
Now all you have to do is attach the straps to the ends of the front. I overlapped by about 1 1/2", and sewed a box with two diagonals to make sure each was very firmly attached. You can attach to right or wrong side, as you wish.

I used red sewing thread, not white, but in the diagram the stitching is shown in white so you can see it. My diagram is missing the bias tape, but you get the idea.
You’ve actually now got a functioning seat harness. See important safety information below. To put the baby in it, check the height of the seat back and decide how long to make your adjustable seat part. Hook the ear holes over the ears or corners of the chair back. Tighten up the drawstring. Sit the baby on the seat part. Pull the front up to her armpits. (Or his, of course!) Take the straps round the back and through the strap loops, and fasten the buckle behind. Check whether they need tightening. The baby needs to be secure. But note the baby should still be supervised at all times.


And it seems to meet with the baby's approval! She's spotted me with the camera.
You can put a cushion underneath if you want to raise the baby's height, but be very careful with this. Make absolutely sure it can't slip. Safer without. Though as you can see, we've tied on a couple of the tie-on type of cushions.
There are two more things you can consider if you want to be able to use it on different types of chairs. You could skip these if you only ever use one or two types of chair and the harness already works for those.
Making a back support (optional)
The idea of this is to go right round the chair back and bridge any gap between the chair seat and where the back starts. (As on this chair.)

If you are having two layers (recommended), sew them together right sides together, turn right side out, and sew the ends up.


I think it neatens it to oversew the sides and ends.

Then sew long strips of wide Velcro along the length near each end, one on each face (or double strips of narrow Velcro if it’s all you have.) I made mine 41 cm (about 16"). But you may need to do a bit of trial and error, taking into account the chair you may use. Having a fairly long strip of Velcro means you can use it on a variety of chair widths.


Making the harness even more adaptable
There are some chairs with arms that might present a problem. Our dining armchair above doesn't, because it also has a back which is higher than the arms, and so the harness just fits normally over the top. However, some chairs, like those at our local David Lloyd centre, have lower backs, and arms that are pretty much the same height as the back, giving you nothing much to put the fold-over part over.

If you think you may use the support with this type of chair (or you are making this as a gift and want it to be fully flexible) there are a couple of possibilities. One is that you can you have some Velcro or press-studs on the back near the strap loops, with the other half of the Velcro or press-studs lower down the back, so that you can attach it to itself over the top bar of the chair. This would stop it sliding down, Alternatively (and better) you can sew a large button on each side where the foldover hem joins the side. Then make 2 elastic loops about 3"-4” (7.5 cm - 10 cm) long, to go round a chair arm, and attach both ends close to the button. You could maybe use button hole elastic to give a bigger range of chair arm circumferences.Then the loop will go round the arm and back up to fasten the button, and the fold-over part of the harness will just hang over the top of the chair back. Personally I would prefer not to use this type of chair, especially with a very young baby, but if it's your only option, I would try and put the loop round both the arm and the stile in this case. Either way, you would also need the back support.
I also considered making straps to go over the baby's shoulders, with more strap loops (probably horizontal this time, and on the front), to give more support. My side straps are attached at the ends of the front, (where the double cherries are at the point) and go round the baby's sides to the back. The front straps would be attached to the top of the front, each one 3" - 4" (7.5 cm to 10 cm) from the centre front, and would go over the baby's shoulders and through the extra strap loops. I hadn't figured out the fastening, because by the time I thought of this, all the grand-babies were able to sit up much more securely on their own, so I never did make the shoulder straps. I thought they would go up and over the horizontal strap loops, and fasten to themselves with press-studs (snap fasteners.) You'd have to make sure there was no chance that the straps could get caught round the baby's neck. If you want to add such straps, I leave it to you to figure it out. (If we get any more grandchildren, maybe I'll re-visit it.)
I also considered making straps to go over the baby's shoulders, with more strap loops (probably horizontal this time, and on the front), to give more support. My side straps are attached at the ends of the front, (where the double cherries are at the point) and go round the baby's sides to the back. The front straps would be attached to the top of the front, each one 3" - 4" (7.5 cm to 10 cm) from the centre front, and would go over the baby's shoulders and through the extra strap loops. I hadn't figured out the fastening, because by the time I thought of this, all the grand-babies were able to sit up much more securely on their own, so I never did make the shoulder straps. I thought they would go up and over the horizontal strap loops, and fasten to themselves with press-studs (snap fasteners.) You'd have to make sure there was no chance that the straps could get caught round the baby's neck. If you want to add such straps, I leave it to you to figure it out. (If we get any more grandchildren, maybe I'll re-visit it.)
A storage bag
Finally, I made a little storage bag for transporting the harness around. I had literally scraps of the denim left, after cutting out the harness and the band. (The band came out of the bit that is unfolded in the picture below - you can see the wrong side of the fabric.)

So I made a sort of jigsaw of the scraps, and sewed them together to get 2 rectangles about 38 cm (15") x 23 cm (9") each. I put these right sides together and sewed up the sides and bottom to make a bag shape.
So I made a sort of jigsaw of the scraps, and sewed them together to get 2 rectangles about 38 cm (15") x 23 cm (9") each. I put these right sides together and sewed up the sides and bottom to make a bag shape.
This was to be the inside lining, as it really was a jigsaw. The outer was made of my second fabric (the cherries), just fractionally bigger, to allow for the thickness of the materials. In fact for the outer, I used just one piece of fabric about 38 cm (15") x 45 cm (17 3/4"), so I just needed to sew the bottom and the one side. I then put the liner inside the outer, wrong sides together, folded in a small hem on both the layers (towards each other). The two bags were over-sewn together at the top, and I also made another seam about an inch below the top seam. I then unpicked the side seams on the inner layer between these two top seams, and threaded through 2 red drawstring cords, to be pulled from each side.

Here's the folded harness being put into the storage bag.

So there you have it - how I made a dining chair harness for our grand-children. Of course, we could just have bought another booster seat, or bought a ready made harness, but how much nicer to have one which was home-made, and very portable.
1. This harness is not suitable for very small babies. A baby must be able to pretty much sit up on her own, supporting the weight of her own head. Our grand-daughter was 7 months when she first used it - but she was very premature, so other babies might be able to use it younger. It worked for her until she could sit on an adult chair reliably.
2. You should never leave a baby unsupervised in a harness.
3. Make sure you thread the straps correctly, and fasten them up firmly. The child should be supported under its armpits.
No comments:
Post a Comment